Every hunter who’s ever loosed an arrow knows it falls fast. Therefore when shooting at longer ranges, we must compensate for an arrow’s rainbow-like trajectory—called parabolic arc—by aiming higher. Lucky for us, sight pins make it simple.
On a wide-open target range with little wind, long-range shooting is relatively easy. Simply zero a pin at a known distance, shade for wind and focus on releasing a good shot. But in a woods rife with leaves, limbs and logs, it’s a different ballgame.
Although you might be able to see your target’s vital zone clearly, your arrow could strike an obstacle above it and out of your focus as it arcs over the imaginary straight line formed between your eyes and the target—called line of sight. Other times, a shot that looks impossible due to an obstacle between you and your target may actually be makeable. That’s why all bowhunters should know their arrow’s exact flight path. While a chronograph and a computer program are helpful, the best way is to map your exact setup on the range.
Chart Arrow Trajectory
Arrows must rise above the shooter’s line of sight if they are to hit targets much past 10 yards, though the extent of that rise depends on arrow velocity and other factors such as elevation above the target. Because nearly all bow and arrow combinations are different, I recommend establishing your own drop chart by following these steps.
STEP 1: Zero your top sight pin at 10-30 yards. I prefer to zero my top pin at 20 yards. (You can chart trajectory with a single-pin sight, but you’ll lose a couple advantages I’ll mention later.)
STEP 2: Set up a tall target at the maximum distance you intend to shoot while hunting, and place a bullseye near its top. Since 60 yards is my maximum hunting range, I’ll use that as an example. For that range with my current setup, I need a target (and backstop) that’s about 5 feet tall.
STEP 3: Standing 60 yards (or your maximum hunting range) from the target, aim at the bullseye with your previously zeroed top pin. Arrows should impact well below the bullseye but still on the target. If they fall short, you need a taller target. Shoot until you get a decent group.
STEP 4: Measure and record the distance from the center of the bullseye to the center of the group. This is the amount the arrow drops from your top-pin zero, but it will also be the arrow’s peak trajectory—the maximum height the arrow will rise above line of sight—when you zero a pin at this range. Next, place or draw a bullseye on the group’s center. You’ll use it later for zeroing your maximum-range pin.
STEP 5: Repeat the process for all practical ranges. Shoot from 50, 40 and 30 yards, for example, but always aim at the top bullseye with your top pin. Use the data to make a chart (see example).
STEP 6: Zero your remaining pins to the ranges you charted. For the least effort, draw your bow, aim at the top bullseye with your top pin, and check to see if from 50 yards your 50-yard pin, for example, coordinates with the bullseye covering your 50-yard group. If it doesn’t, adjust your 50-yard pin until it centers on the 50-yard bullseye when you’re at full draw. Confirm the zero by shooting a few groups. Repeat this process for each pin.
Shoot or Don’t Shoot
By studying my trajectory chart, I know that if I see a deer at 60 yards but the forest canopy between us is only 4 feet above it, I can’t shoot without kneeling down or somehow getting lower. As another example, if I’m going to shoot at 40 yards, overhead foliage and branches between me and the target cannot be less than 14.5 inches above my point of aim. At 30 yards and closer, my arrow only drops 4 inches, so I can pretty much hit any vital zone that’s not obscured. You can verify a clear flight path by holding the range-appropriate pin on the target and then checking the top-most pin to make sure it’s safely below obstructions—so you don’t have to remember the chart.
It’s also worthwhile to chart the flight path at ultra-close range. With my setup, the arrow path first intersects my line of sight at 8 yards, and so my 20-yard pin is zeroed at 20 yards and also at 8. But at 6 yards, I actually have to hold over (yes, over) the target .5 inch to be spot-on because the arrow is rising to my line of sight but hasn’t quite reached it yet. At 5 yards, I should aim 1 inch high. One yard? I need to aim 3.5 inches high, which is the distance between my rest and sight pin.
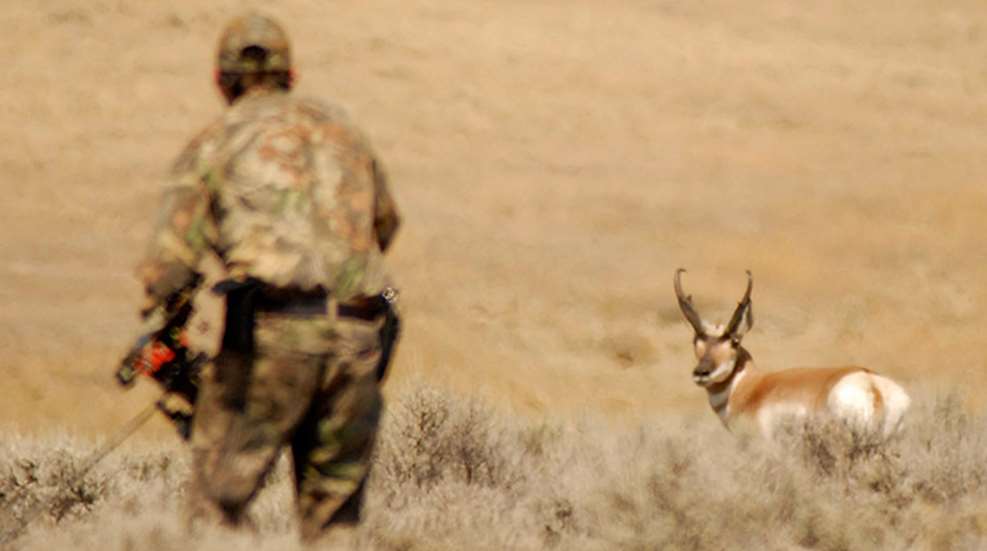
Knowing your arrow’s trajectory can occasionally be used to pull off shots you might think impossible. Say you’ve stalked within 60 yards of a 16-inch pronghorn, but the rascal is standing exactly behind a sage bush that covers his vitals. The sage bush is 30 yards from you, and while you can make out the vital zone of the antelope feeding in the open behind it, there’s no way your arrow would make it through the bush. No worries—it’s not going through the bush. Come to full draw, hold your 60-yard pin on the pronghorn, and check to make sure your 30-yard pin is clearly above the sage. If it is, your arrow will arc over the bush on its path to the giant’s vitals. When you know the exact flight path of your arrow, you can make shots you might not otherwise take—and refrain from taking those that would turn out poorly.