“When setting up a new bow, the arrow rest is the most critical accessory a guy can choose,” said Tim Gillingham, a pro staffer for Mathews Archery and Gold Tip Arrows and one of the most successful professional archers in the country today. “And when it comes to accuracy, there is no doubt that a good drop-away rest is the best choice.”
I agree with Dillingham. Over the years I have used several different drop-away rests and have found the latest versions to be simple, relatively easy to set up and tune and very hunter-friendly. One model will set up a bit differently than another, but most employ a piece of string material that attaches to the rest launcher arms on one end, and the bow’s down cable on the other—though some attach one end of the cable to a bow limb. The key is making that piece of string exactly the proper length and securing it to the cable or limb so it will not move.
Here are six easy steps for installing and timing a fall-away arrow rest.
1) Mount the rest to your bow (photo key: secure rest)
The first step is mounting the rest securely to the riser. Mount the rest level on the riser using the provided button-head screw and washer. To insure solid mounting and prevent any movement of the rest, tighten the button head bolt and lock the rest to the riser with a set screw, if one is provided with the rest. Be sure that once you’ve secured the rest to the riser you can move the rest’s horizontal and vertical block for correct center shot and vertical set on the rest.
2) Set the center shot (photo key: center shot adjustment)
Next, set your center shot adjustment. To do this, nock an arrow shaft on the bowstring and place the shaft on the arrow rest arm in the up position (as if the rest is at full draw). Loosen the rest’s horizontal block to make necessary left or right adjustments. Once your center shot is correct, snug down the button head screw.
3) Set the arrow level (photo key: level nocking point)
Set your nock or string loop at the approximate desired height. While the arrow is on the bowstring, position the arrow rest arms in the full draw position. Generally, try to keep arrows at the same approximate height as the arrow rest’s mounting holes. A good starting point is to keep the arrow at a level position from the nock or string loop to the arrow rest. Minor adjustments in the rest height can be made later during the tuning process by loosening the vertical block and raising or lowering the block.
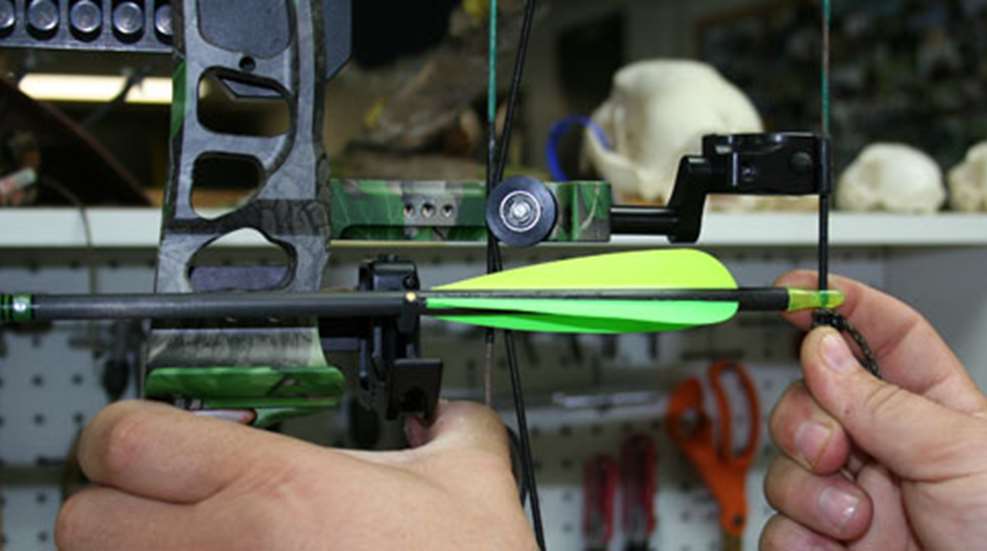
4) Attach the rest’s down cord to the bow’s cable (photo key: short serving)
Attach the draw cord at about an inch below the level of the arrow rest to the bow’s down cable. The draw cord can be attached in one of two ways. Some arrow rest manufacturers include two small pieces that attach to both the draw cord and the down cable. These two pieces are held together and in place by a small screw. Once together, the two pieces are shaped like a football. Tighten the screw down slightly but not snug. Another way to attach the draw cord is to put the cord through the down cable. Just set the down cable about one inch below the arrow rest, and place the draw cord through the down cable at the bottom of the serving.
5) Timing your rest (photo key: bulge in down cable)
This is probably the step most archers fear. With your draw cord attached to the down cable, draw the bow to full draw, insuring that the arrow rest rises fully and that the draw cord is not pulling against the down cable. There should be no bulge seen in the down cable. It should be as straight as if there was nothing attached to it. As you let the bowstring down, the arrow rest’s arm should begin to drop almost immediately. It may be helpful to have a friend check the timing of your rest. As you draw the bow, he can visually inspect that your rest’s arm is up and that your draw cord is not so taut that it is pulling against your down cable. Once this is completed, tighten the football snug. If using the second attachment method, knot the draw cord off at the down cable.
6) Test shooting your bow (photo key: paper tune)
Test the rest by either shooting through paper or set up an immobile target at chest height and shoot an arrow at 6 to 8 yards. If the arrows are going through paper perfectly, the rest is timed and the bow is tuned. If the arrows are not impacting evenly, a minor adjustment is needed. First, check for discoloration on the arm of the arrow rest. If discoloration is present, fletches are making contact. If your center shot and nock or string loop placement is correct, a minor adjustment on the draw cord is usually all that is needed. The draw cord cannot be too tight on the down cable. If it is pulling against the down cable, just loosen the screw on the football and pull a very small amount of draw cord through the football or the down cable to reduce the tension on the down cable when at full draw. Start with a 1/16-inch move, always checking that your arrow rest’s arm rises fully and there is not any bulge in the down cable.
Once the paper tuning process is complete, cut off the excess draw cord and carefully burn the edges of the cord to create a hardened end. Snug down the small screw for the football to ensure cable or cord will not come loose. Installing most fall-away rests should take no more than 15-20 minutes, and will provide perfect arrow flight.