Imagine you’ve saved a year’s worth of overtime pay to book the elk hunt of your dreams. On day one in the Rocky Mountains you’ve stalked within range of the bull of your dreams. You’re in the sitting position, like Dad taught you when you were a kid. The wind is buffeting the muzzle of your rifle, and it’s a bit of a poke, but you’re confident you can hit the vitals of the 6x6. You squeeze the trigger … and you miss.
“That’s hunting,” you say. “I’ll get another chance.”
But what if you don’t?
I’ve seen this scenario play out more times than I care to count, my friends. I’ve seen grown men return to camp who were at a loss for words to explain how they missed that bull. Heck, it’s happened to me.
In fact, a couple years ago I admitted to myself that it was happening more times than I cared to recall. And try as I might, I couldn’t explain why. So I sought help.
Last year I attended not one, but two shooting schools: Gunsite Academy in Paulden, Ariz., and Sportsman’s All-Weather All-Terrain Marksmanship in Barksdale, Texas. Like many NRA members, I’m a lifelong shooter and hunter. I’m also a former Marine infantryman and an NRA-certified rifle instructor. But I have to admit what I learned about marksmanship at both places can fill a book.
You’re probably thinking, “I don’t need to pay anyone to teach me how to shoot.” That may be true. But it’s also true that we spend a lot of time and money on our pastime. So think of shooting school as continuing education for hunters.
At Gunsite Academy I took the five-day Hunter Prep course, an amalgam of riflecraft from their General Rifle 270 class—gun carriage, field positions, trigger and breath control—and topics aimed at big-game hunters such as anatomy, range estimation and mind-set.
Sportsman’s All-Weather All-Terrain Marksmanship (SAAM) is run by Tim Fallon at FTW Ranch, 12,000 acres in the Texas Hill Country with enough gales to teach anyone a thing or two about doping the wind. SAAM Precision Rifle Level I introduces students to the basic field-shooting positions, then adds a wealth of knowledge about external ballistics, the effects of terrain and weather on bullet flight, range estimation, “come-ups” and a primer on doping the wind.
Before you ask I’ll answer a burning question: The best course is the one you actually take.
Having said that, if you take either one, take your hunting rifle and a suitable hunting load, not a target load. It does no good to work up dope for a gun/scope/load combo if you’ll never hunt with it. For both courses, I took my favorite deer rifle, a Kimber 84M Longmaster Classic in .308 Win. topped with a Leupold Mark 4 2.5X-8X-36mm MR/T M1. I love this package. The gun sports nice walnut with a soft recoil pad that makes an all-day shoot bearable, and a 24-inch sporter-contour barrel that gives me extra accuracy and reach without adding undue weight. The scope sports a blend of tactical and hunting features: a 30mm maintube for 90 MOA of adjustment range; Leupold’s Tactical Milling Reticle (TMR), which expands on the mil-dot system with various sized and spaced hash marks on each stadia; and finger-adjustable target turrets. I shot the gun’s favorite hunting bullet, a 168-grain Barnes TSX loaded by Black Hills.
Now think about your favorite gun/scope/load combo, imagine you’re that elk hunter at the outset, and imagine I’m your shooting instructor whispering in your ear as you prepare for a do-over.
Get In Position
Never stand when you can kneel, never kneel when you can sit, never sit when you can lie down. To know when to do what, continually assess the ground and your line of sight during a stalk. Here’s how our (right-handed) elk hunter snaps into position.
Prone This is the most stable position you can take, since your entire body is in contact with the ground. Hold your rifle in your left hand, drop to your knees and fall forward, using your right hand as a brace. Lift the rifle with your left hand, and tuck the butt into your shoulder with your right hand. Angle your body toward your strong (shooting) side. Be sure to keep your support (left) elbow directly beneath the fore-end of the rifle for stability, and spread your legs.
I knew that much from my days in the Corps. But Il Ling New, our chief instructor at Gunsite, also taught me to point my toes outward, and to keep my heels flat on the ground to limit their movement, either from muscle twitches or wind. This can’t be over-emphasized. Fall weather is often accompanied by heavy winds. The last thing you need when shooting from the most stable position you can take is to induce movement.
Sitting
I blew a sitting shot on a springbok in South Africa in 2002 because I wasn’t stable enough. At Gunsite, I learned to “get small,” to crouch lower than I ever had.
To get there, stand 45 degrees into your strong (right) side, with your left shoulder facing downrange. Cross your left ankle over your right, hold the rifle in your left hand and drop to your butt, using your right hand to brace your fall, and sit cross-legged. Place your left triceps over your left kneecap (or plant your elbow in the pocket formed by your bent knee). Hold the rifle in your left hand, and use your right hand to place the rifle butt in your shoulder. Then place your right triceps over your right kneecap (or place your elbow in the pocket formed by your knee). Now sink into position.
This is as low as you can go while seated, and next to prone it’s the most stable position. But scrunched as you are, you’ll compress your diaphragm and it’ll be hard to breathe. Snap into it on the range to stretch muscles and joints.
Kneeling
This is my favorite because it gives me three things: a stable platform I can reach quickly, a commanding view of the field and the ability to move quickly should the situation change.
Face downrange with your feet shoulder-width apart. Step forward with your left leg, bend at the knee and drop onto your right heel, and sit on it. Place your left triceps over your left kneecap. Hold the rifle in your left hand and place the rifle butt in your shoulder. Lean forward just a bit, let your left triceps melt into your left knee, and let your butt sink onto your right heel. You can also drop your right ankle to the ground and sit on either the outside or inside of it (neither way is comfortable for me). The No. 1 problem here is your “chicken wing,” your right elbow as it dangles out there unsupported.
Standing
This is the least stable, and it should be used only at close range when there is no time for anything else. Don’t fire from the “blade” position, with your weak-side (left) shoulder pointed downrange, as you would in competition. This will pull your shots right if heavy recoil is a problem. Instead, “square up” to the target. Face downrange with the rifle at port arms, feet shoulder-width apart, right foot back slightly. This will send recoil straight back into your shoulder, and will keep your shots from straying right. Now, in one smooth motion, bring the rifle butt to your shoulder pocket, keeping your left arm beneath the fore-end. The sights should come to your eyes. Don’t drop your head to find the sights as the rifle butt reaches your shoulder. Keep your eyes on the target. With practice, you can reliably engage targets out to about 75 yards in a snap.
In the prone, sitting and kneeling positions it pays to use a sling. Instructors at Gunsite talked me into purchasing a Safari Ching Sling. It creates a three-point sling out of two points of contact on your rifle, the front and rear swivels. The sling is split, and a loop is strung between the two pieces. Adjust it for length, and cinch it up above your support elbow, close to your armpit, before snapping in to take an MOA of wobble out of your groups.
Dog’s Tricks
Each of these positions comes intuitively, but none will be comfortable without practice. Come to think of it, none are comfortable to a middle-aged guy with a gut and bad knees. At SAAM, instructor Doug “Dog” Prichard said it never hurts to cheat a little.
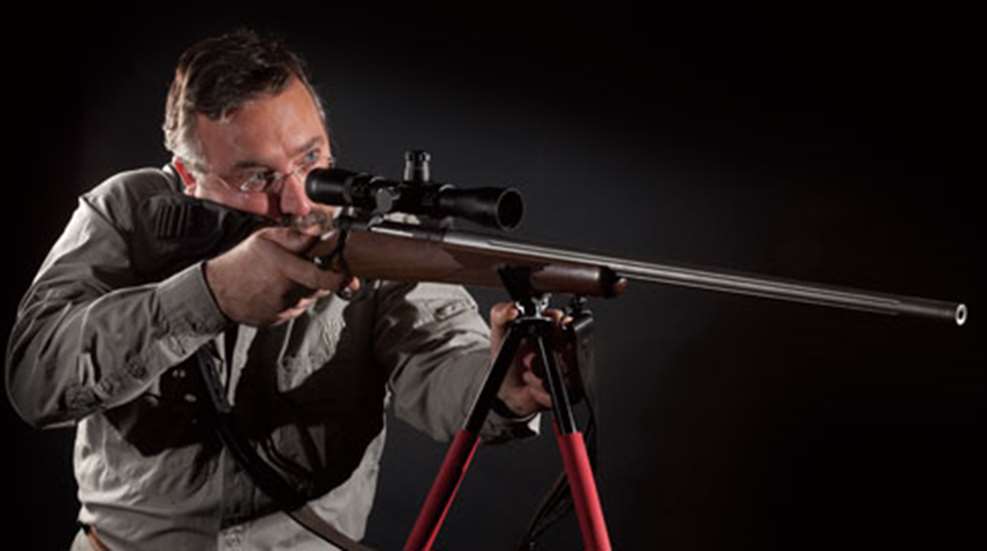
For starters, he says, never leave camp without a pack and shooting sticks.
It’s true you need to be able to snap in quickly. Time is critical. But don’t pit it against you. Often you’ll find yourself with the wind and the range to your advantage. Remember the first shot is the most important. Make sure you’re as stable as possible before firing, even if it takes longer than you think it should to set up. Use the best position possible, given field of view and terrain. But never take an unsupported shot when you have time to find or build a rest. Dog likes to call this “building your house.”
In the prone when resting your gun’s fore-end across a pack, let go of the rifle with your left arm. Reach beneath your body and grasp the sling swivel on the buttstock and pull the rifle into your shoulder. Be careful not to touch the buttstock, as this will induce movement. Minimize contact with the rifle, as you’d do on a shooting bench.
While sitting, you can take out roughly one MOA by leaning against a rock or tree. If neither is present, ask your buddy to lean against you. This will remove some wobble and place him as a spotter directly in line with you. Stuff your pack under your chicken wing to take out another MOA. Stuff your buddy’s pack under your left arm. You might look like the Pillsbury Doughboy, but you’ll be rock-solid.
The same trick can be used while kneeling. If it hurts to kneel and sit on your heel, place your pack under your thigh, then sink onto it to avoid the pain.
When using shooting sticks in the kneeling position, drop to your weak-side (left) knee. The rifle is already supported by the sticks. Instead, use your strong-side (right) knee to support your chicken wing. This is amazingly stable, as it builds a shooting platform with contact front and rear.
Breathe
You can’t breathe normally while firing. The movement of your chest will cause movement of the rifle. As you set up to fire, take three breaths. Let out half of the last one and hold it, then begin your trigger squeeze. If that squeeze takes longer than 10 seconds muscle tension and even blurred vision can result, because you’ll begin to run out of air. So stop, take a few more breaths and start again.
Once you take your breath, relax. Be sure the rifle stays on target. This is known as your natural point of aim. You may need to adjust your position.
Focus
If you’ve never shot a rifle with open sights, you’ve probably never heard of sight alignment and sight picture. For the record, they’re not the same thing.
Sight alignment is the proper alignment of the front sight post within the rear sight aperture; the top center of the front blade is exactly centered in the rear aperture. The correct sight picture is obtained when the sights are properly aligned and the target is in the correct relationship to the front blade.
A riflescope places both sights in one focal plane, so sight alignment is done for you. You need only worry about the sight picture. But once you have that sight picture, it’s important to focus solely on the reticle as you squeeze the trigger. Done correctly, each time the gun fires it should be a surprise.
I knew that much, but I didn’t realize I was using the scope to check my groups. I wasn’t focusing solely on the reticle each time I fired, and Mike Moore, an instructor at Gunsite, corrected me.
“Ideally,” he said, “you won’t see the animal’s reaction through the scope, because you’ll be focused on the reticle; the animal will be blurry.”
At SAAM, Dog reminded me to call my shots, to make a mental note of where the reticle was when the gun fired. It’s an important step to diagnose problems with marksmanship. Was the reticle to the right of the bullseye when the gun fired? Maybe I jerked the trigger. Was the reticle sagging below the bullseye? Maybe I waited too long before firing and got tired or ran out of breath.
Beyond that, it’s all “breathe, squeeze and follow-through,” as Dog says.
Squeeze
You should squeeze (some say “press”) the trigger by slowly applying rearward pressure until the rifle discharges.
At Gunsite, my shots consistently grouped a bit right. Mike Moore suggested I move the thumb of my shooting hand to the right side of the pistol grip to isolate my trigger finger for a better squeeze. That also eliminates cant in the rifle and positions my thumb better to reach the safety, whether it’s on the tang or the right side of the receiver.
You should know just how much pressure you can apply to your trigger before your rifle discharges, allowing you to stop the squeeze if needed when the elk shifts and you need to halt action.
Practice isolating your trigger finger and applying direct pressure rearward by cupping a ballpoint pen in your hand and gently pressing the clicker until the pen point appears. Do this slowly and repeatedly, until you can stop just before the pen goes “click.” This is the kind of muscle memory you need on the trigger.
Follow-Through
Elk won’t stand around all day. Build your house, get your sight picture, focus, breathe and squeeze. Now. The longer you wait, the more you’ll wobble. Soon, you’ll doubt yourself, the animal will move ... whatever. So get on with it.
Note that I didn’t say rush. My main problem is a failure to follow through, mainly caused by rushing. To compensate for this, I chant to myself, “Breathe, squeeze and follow-through.”
When the round fires, continue to focus on the reticle and hold your position. Reload. Now. Deliberately lift your finger from the trigger and move your hand to the bolt. With the gun on your shoulder and your head in the scope, chamber another round. Don’t admire your shot. And don’t yank your head out of the scope to see your handiwork.
This is a fine line. No one can resist the forces of recoil completely. But with practice you’ll be able focus on the reticle even when the gun roars, which will help you call your shot. In the field, I often see the reaction of the game in my scope after I recover from recoil and while reloading for a second shot. (Yes, I can move that fast. You should, too.)