Practice doesn’t make perfect; perfect practice makes perfect. The first time I heard that was during a self-defense handgun class at SIG Sauer Academy. While the instructor used the phrase to hammer home the importance of serious and deliberate pistol practice—not just emptying a magazine at the target—it applies to bow practice, too. Don’t just fling arrows to fling arrows; make the most of your range time by practicing perfectly. Follow this approach:
1. Do start early.
That means now, if you haven’t started already. If the last time you drew your bow was back in November, the muscles you use to pull the string and keep it anchored need strengthening. It takes more than a few weeks for that to happen. Start working them early—by July, if not before, for an October opener—so you can ease into your practice routine. You may only be able to shoot a dozen or so arrows per session before your muscles get tired during the first couple weeks, but so what? Because you started early, you have months to get in shape.
2. Do focus on every shot.
Practice deliberately, paying close attention to every stage of the shot sequence. Smooth draw, solid anchor, precise pin placement, clean release, complete follow-through. Don’t get sloppy and punch the release, or drop your arm just because you’re not shooting at an animal. Draw like you would on wary game—without excess movement, while looking at the target. Perfect practice forms perfect habits.
If an arrow hits high or left or anywhere other than you intended, stop to figure out why. Don’t just shrug it off. Something went wrong. Did you pick an exact spot on the target to hit? Was your form to blame? Did some part of your equipment malfunction? Find the answer and correct the problem now so it doesn’t happen again.
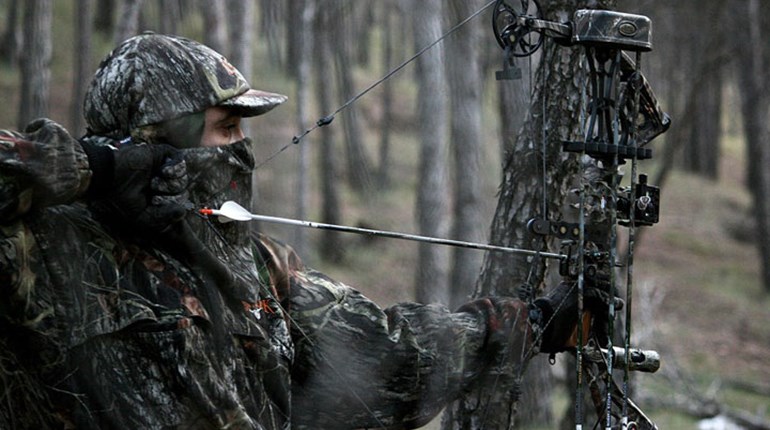
3. Do shoot from a stand.
Most of us in whitetail country hunt from a treestand, so it only makes sense that we should practice from one. Shooting with your feet on solid ground is fine for working out offseason kinks and warming up, but then it’s time to go aloft. Shot angle, the position of your body and how it interfaces with your bow, and even point of aim change when you’re in a stand. It’s a different world up there, and you should be prepared for it.
Hang a stand in your backyard and keep it there until the season is over so you won’t have an excuse to not shoot from it. Wear a harness, of course, for both safety and realism. To simulate a hunting scenario even more, practice in your hunting clothes, including gloves. If you normally hunt with a bino strapped to your chest, practice the same way. Ditto for a grunt tube. Now’s the time to see if any of your gear is going to interfere with your shooting. Yes, it will be hotter than if you were practicing in shorts and a t-shirt. Suck it up. Train like you hunt.
If you’re a stalk-’em-in-your-socks Western bowhunter, you can ignore the above—kinda. Shooting at a steep downhill angle is similar to shooting from a treestand. On the other hand, you may have to shoot at an elk or a mulie feeding uphill from you this season. Find a place to practice these types of shots. Make shooting from a kneeling position part of your regimen, too. If you hunt from a blind, practice from one.
4. Do shoot 3D targets.
Shooting at paper or cube-style targets is great for tuning up your form and bow, but game doesn’t exist in only two dimensions with convenient “aim here” spots painted on it. For realistic practice, spend the cash and get a 3D target. Whitetail versions are available from online retailers for less than $80. A 3D target presents a lifelike, life-size vital area no matter its angle to you, which is just the ticket for practicing quartering and elevated shots. Even better, you can see how various angles dictate shot placement by examining the arrow’s path and comparing its entry to its exit.
5. Do practice holding at full draw before taking a shot.
What bowhunter hasn’t drawn on an animal and been forced to hold… hold… HOOOLD… with shaking arms and ragged breaths, while the dang thing takes its sweet time stepping into a shooting lane? After what seems like an eternity, you finally have a shot, immediately dump the string to relieve your screaming muscles—and miss. Don’t let that happen this season. After a few weeks of dedicated practice, work “hold drills” into your sessions. Ask a buddy to keep time after you draw and give the “shoot” command when 15, 30 or 60 seconds (or more) have elapsed. Then, make that shot count. If repeated regularly, this exercise will help build strength, but more importantly it will demonstrate the need to maintain form and follow-through under stress.
Of course, you could be faced with the exact opposite scenario this season: You have 3 seconds to draw and shoot before the animal is gone into the brush forever. If it takes you 5 seconds to anchor and align your pin, you don’t have a chance. Practice shooting quickly so you can get an arrow on its way in a hurry if the situation dictates. Here’s the important part: That arrow must go where it needs to. Think about speed, but focus on accuracy. The goal is to shoot quickly without rushing the shot.
6. Don’t shoot until you’ve checked your equipment.
Before you loose (or lose) an arrow, make sure everything is tight. Check the screws and bolts on your bow’s sight, rest and even limbs. Look over the string and string loop to be sure they aren’t frayed. Examine the limbs under a strong light for cracks. Be sure cams and wheels aren’t bent or nicked. Strange things happen to bows in the offseason. Check your arrows for cracks and splinters (carbon or wood shafts) or straightness (aluminum). Give your target a good once-over to confirm it still has enough material left in the sweet spot to stop arrows.
7. Don’t overlook close-range shots.
While many bowhunters focus on extending their maximum range, shots at top-pin distances need attention, too. Practice at 10 and even 5 yards—especially if you hunt out of a stand. Shots at spitting distance can be tricky from an elevated position because they require a sharp bend at the waist. Shooting a 3D target at close range will reveal how much higher your arrow must enter in order to hit both lungs, and you will learn how to adjust your point of aim. These aren’t gimme shots by any stretch; the steep angle between a treestand and a deer separated by a short distance necessitates precise arrow placement for a vital hit.
8. Don’t shoot only in full daylight.
Again, the more realism you can add to your practice, the better. The first and last 20 minutes of legal shooting light is primetime for encounters with game, so prepare for these scenarios by practicing in similar lighting conditions. Now is the time to determine whether your peep sight allows enough light to pass through for shots at dawn and dusk. Deep shadows can also make aligning a pin on an animal tricky, so try to replicate this situation during practice. In addition, if you hunt in rain, snow or sleet, embrace nasty weather by practicing in it.
9. Don’t forget to shoot hunting arrows and broadheads.
Leave nothing to chance. Confirm the exact, individual arrows you’ll be carrying afield this fall fly correctly with the same brand and model of broadhead you’ll be using. Many of today’s broadheads impact very close to field points when shot from modern bows, but to assume that’s the case with your setup is simply irresponsible. So you’ll sacrifice a pack of broadheads and wear out your target faster—you owe it to the game and to yourself to make sure your equipment is dialed in. I switch to broadheads at least a month before the season simply because I want to practice with the gear I’m going to use during the hunt. Of course I put new broadheads on my hunting arrows before heading out for game, but since I’ve already practiced with the same model for weeks, I’m confident they will fly true.
10. Don’t practice too much.
Bad habits form when you start to get tired. Quit for the day, or at least for several hours, before that happens. Focus on the quality of your shots, not the quantity. Shooting a dozen perfectly placed arrows is a much better practice session than scattering four dozen all over the target. Short sessions put less strain on your body and your mind.
Bonus: Don’t stop practicing.
This doesn’t mean practice all day; it means practice all year. When the season opens, practice isn’t over. Work regular practice sessions around your hunts to maintain the skills you’ve honed over the past months. In fact, it’s better to skip a hunt to practice than to make a poor shot on an animal because weeks have passed since you last fired an arrow. In-season practice may well be the most important practice of all. And after you’ve filled your tags, keep shooting to get ready for next season!